September’s Lunch Bunch Swaps

A quick preface by Jim.  The migration from GoDaddy to HostGator seems to be bogged down so we are making a post while we sit in queue.  Again, I want to emphasize that Pat’s website and blog will be fully functional during this process and you can visit at your leisure.  Now to Pat’s Post.

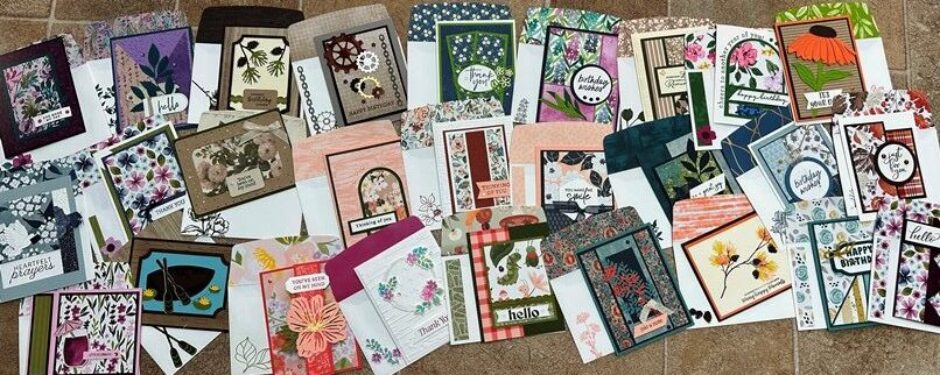
I want to share the swaps I received at the past week’s Lunch Bunch & Swap. They are beautiful and adorable and I’m so happy to have them.  I asked the swappers if I could post their cards on my blog and everybody said yes.  However, it was a split decision about giving credit to the swapper, so I won’t list the creaters’ names.

If you’d like to do a Lunch Bunch and Swap or just come visit and bring your own lunch, please let me know a date that will work for you.  I think we’re all enjoying them, and it’s an outing.


These two are made using the Love of Leaves bundle.  This is a bundle that I believe everybody should own.  It’s very different than any bundle that we’ve ever had before.  I’ll tell you more about it in a later post.


These two are so Christmasy.  Aren’t they adorable and beautiful?  The cabin card features the Snow Front, and the candy cane card is made using a scalloped punch.


This sympathy card is so elegant.  Love it.


Isn’t this little post it note holder adorable?  I love that owl. There were several to choose from and they were all so cute.


This is the card that I swapped.  It features the Arrange a Wreath Bundle.  I don’t remember who the original was by, but I fell in love with this card as soon as I saw it.

You’ll probably notice that several of the swap cards feature the Plaid Tidings designer series paper.  It is so versatile; there are many colors in the package and each sheet seems to be put together perfectly.  There’s a black & white sheet that I love but haven’t yet used.

Please let me know if you have any questions:  text or call 303-888-1862 or call 303-674-6435.

I appreciate you so very much, Pat

Posted in Uncategorized | Tagged , , , | Comments Off on September’s Lunch Bunch Swaps

New Posts will be on hold for a few days

Hi all, Jim here.

We are in the process of migrating our web hosting from GoDaddy to HostGator.  I will give you more information on the reasons down below if you are interested in technical minutia {grin}.

During the migration we will not be posting to our blogs.  Any posts (or comments) made during the migration will be lost (more minutia below).

The migration process will take up to 5 days.  When we make the actual changeover to the new host, there could be a short period where we will be off line.

During the migration, you will be able to use all of the functions at stampinlady.com.

If you have any questions please contact us:

Email:  pat@stampinlady.com
Phone or text – Pat:  303-888-1862
Phone or text – Jim:  303-478-3501

What follows is technical minutia:

Nine years ago we switched our hosting to GoDaddy.  It was a great experience for many years.  However, GoDaddy has slowly migrated to a less helpful host who had chosen to charge rather high yearly costs for services that other hosts provide free of charge.

In addition, we are hosted on rather outdated servers with what could be called a legacy platform.  That platform has significant restrictions that compromise the integrity of our websites.  We must spend a significant amount of effort to convert our websites/blogs to what is called a cPanel platform.  cPanel has become the standard platform for all hosting companies.  The old legacy servers will be turned off at the end of the year.

Since I need to make all of our websites/blogs compatible with cPanel, I have made the decision to switch our hosting account to a cPanel account on HostGator.  They are highly rated and provided several services that GoDaddy no longer provides (or charges outrageous prices for).

Jim


Posted in Uncategorized | 2 Comments

Stampin’ Up! 24-Hour Flash Sale, Wednesday, September 23rd

Stampin’ Up! just announced a 24-hour flash sale that will take place on Wednesday, September 23rd.  It will begin a 12:00 a.m. and end at 11:59 p.m.  I’m very excited about it.  The sale items will be from the annual catalog.  Have fun choosing your favorites.


Posted in Uncategorized | Tagged | Comments Off on Stampin’ Up! 24-Hour Flash Sale, Wednesday, September 23rd

September Incentive Cards’ Details

The cards in this post are the cards for the kits that you’ll receive, free of charge, in your packet when you place a $50+ order, using my September host code: WY2WHGCG.  These cards were all made with Stampin’ Up! products.

It is not too late to qualify for these four card kits – you have until the end of September.  To place an order click on the shop now tab in the menu bar.

Love of Leaves Have a Beautiful Day Card

 Original by Gloria Plunkett

I think you’re going to discover that you absolutely need this Stampin” Up! bundle.  It’s the Love of Leaves bundle, shown on page 49 of the mini catalog.  The number item number is 155195 and the price is $47.50.  With the dies, you can cut out the leaves and at the same time put the embossing piece of the dies inside the leaf and it does everything at once.

The directions for this card are amazingly easy.  Everything is cut for you—you only need to stamp the greeting and assemble the card.

The greeting banner is cut using the Classic Label punch.  This is already done for you, but when you do it, you’ll cut a piece of card stock the width of the punch opening and the length that you want the banner to be.  From the bottom of the punch, put one end in and punch it and then put the other end in and punch it.  You can make a banner of any length.

The banner is adhered using dimensionals.  Everything else is attached using Seal (snail) except for the bow, which is attached with a glue dot.

Assemble and add the 2020-2022 In Color Enamel Dots.

The extra plaid piece is for the envelope flap.

Ingredients used include:

Love of Leaves bundle, mini 49
Beautiful Autumn stamp set, mini 46
Early Espresso card stock, 142
Crumb Cake card stock, 142
Cinnamon Cider card stock, 143
Old Olive card stock, 143
Bumblebee card stock, 143
Rich Razzleberry card stock, 142
Whisper White card stock, 143
Plaid Tidings designer paper, mini 57
Peony Garden designer paper, 149 (for the designer paper behind the leaves)
Bumblebee pad, 143
Pear Pizzazz pad, 143
Rich Razzleberry pad, 142
Linen Thread, 161
In Color Enamel Dots, 158
Autumn Punch Pack, 166
Classic Label punch, 166

Hello Love of Leaves Card

Original by Mary Fish

This one, too, is so easy. Everything is cut for you; the only thing you need to do besides assembling it is to stamp your little greeting. You can stamp the envelope, and the inside of the card if you wish`.

There are three layers to the front of the card (excluding the cut out leaf).  After you score your base card, assemble the plaid designer paper and the piece from which the leaf is cut.

That will all then go onto the card base.

Before you add the greeting, tie a little bow with the Linen Thread.

The white leaf is adhered with dimensionals and the bow is attached with glue dots.

Ingredients used include:

Love of Leaves bundle, mini 49
Whisper White Thick card stock, 153
Whisper White regular card stock, 143
Plaid Tidings designer paper, mini 57
Bumblebee card stock, 143
Bumblebee pad, 143
Cajun Craze pad, 142
Stitched Rectangle dies, 183
Linen Thread (10”), 161
2020-2022 In Color Enamel Dots, 158
Dimensionals, 162


Gilded Autumn Hello Card


Original by Barbara Ragsdale

Isn’t this a cool card—it’s using the gorgeous Gilded Autumn designer paper.  Every design in that package is absolutely beautiful.  The little pieces are 2” x 1 ¾” pieces, so you may have scraps to use up.  I love the little acorn–it’s bulky but so darn cute.

This card is scored for you as it is cut 11 x 4 ¼” so it wouldn’t fit into the package if it weren’t folded.

Attach the four little squares (rectangles) to the Early Espresso piece, leaving a space in the middle for the ribbon and greeting. They’re attached with Seal (snail).

Wrap the ribbon around the Espresso piece and tie a knot as shown.  Then thread the linen thread through the acorn and tie it to the knot.

The greeting is attached with dimensionals.

The longer piece of designer paper is for the flap.

Ingredients used include:

Beautiful  Autumn bundle, mini 45
Forever Fern stamp set for the greeting, 110
Very Vanilla Thick card stock, 153
Regular Very Vanilla card stock, 143
Early Espresso card stock, 142
Gilded Autumn designer paper, mini 45
Early Espresso pad, 142
Mint Macaron pad, 143
Basket Weave ribbon, 13”,  mini 45
Linen thread, 3”, 161
Acorn trinkets, mini 45
Dimensionals, 162


Many Mates Medallion Card


Original by Linda Heller

Isn’t this an amazing card?  The black medallions are cut with the Cut & Emboss (Big Boss) machine; it’s just one piece.  I’ll go on record here to say that the little pieces fall out SO much better with the Big Boss.  It uses all of the 2020-2022 In Color colors.  The strips are 5/8” wide and they slide right in there.

Adhere the white piece of card stock to the front of the base card, centering it as well as you can.

I’m going to tell you how to put the strips in and attach them.  It looks more complicated than it is.  Lay the black medallion piece face down. Slip one end of the colored card stock through one end and then hold that piece with your fingers away from the medallion piece.  Add a tiny dot of glue in center of each black medallion of that row.  There’s a perfect place for the glue—in each little solid square. Lower that strip to the glue and press into place—you might need to hold it for a few seconds.  Then slip the other end of the colored strip into the medallion piece.  You’ll do that for each strip starting at the top.

When you’re finished with the strips, add glue to attach the whole thing to the white layer.

Stamp the greeting with whatever stamp you choose.  Add several dimensionals to the back and stick the ribbon onto the dimensionals—folding it in half before you attach it to the dimensionals.

There are tiny flowers and Gold Glimmer Enamel Dots in your little plastic bag.  After you’ve attached the greeting piece, add the flowers randomly with glue dots.  Add a glimmer dot to the middle of each flower.

Aren’t these beautiful cards?  I’ll send you your kits as soon as I get them ready–hopefully before too long.  I can’t wait to send them to you.

Ingredients used include:

Many Mates bundle, 43
Tasteful Touches,124
Bumblebee card stock,143
Misty Moonlight card stock, 143
Cinnamon Cider card stock, 143
Magenta Madness card stock, 143
Just Jade card stock, 143
Whisper White card stock,  143
Basic Black card stock, 143 (I cut a piece 5 ½” x 4 ¼ ” to start with.)
For the flap: Playing with Patterns designer paper or 2020-2022 In Color designer paper or Flowers for Every Season designer paper.
Just Jade pad, 143
Magenta Madness pad, 143
Blends: Dk Just Jade and Dk Magenta Madness, 143
Bumblebee ribbon, 160
Gold Glitter Enamel Dots, 157
Green Glue, 162
Dimensionals, 162
Label Me Lovely punch, 166
Confetti Flowers Border punch, 168
Posted in Uncategorized | Tagged , , , , | 11 Comments

September Incentive Card Sneak Peek

Hello My Dear Stamping Friends,

We hope you’re doing well.  We are still boring and pretty much staying home.

Original by Gloria Plunkett


Original by Mary Fish


Original by Barbara Ragsdale


Original by Linda Heller

These cards are the cards for the kits that you’ll receive in your packet when you place a $50+ order, using my September host code:  WY2WHGCG.

This your sneak peek—I don’t quite have the directions or ingredients list ready.  They’ll be posted soon.  The bundles/suites that we featured are:

Misty Mates bundle, p.43 in the mini catalog
Gilded Autumn suite, p. 45 in the mini catalog
Love of Leaves bundle, p. 49 in the mini catalog

I’ll post a couple more cards created using the Gilded Autumn suite.  These cards are all so beautiful—the designer paper is amazing!

We also used the Plaid Tidings 6 x 6 designer paper on a couple of cards.  I love this plaid paper.

I have a tip for you for cutting 6 x 6 designer paper:  you’ll need two 6 x 6 sheets for two cards. Trim the first piece to 6 x 5 ½  and hold on to the little piece that you cut off. Then cut that piece in half making each piece 3 x 5 ½ .  I’ve been using these as the focal point of a card.  I’ll try to post a picture later. So for this card, I use a card base of a coordinating color; then layer on a another coordinating piece that is 5 ½ by 3 ½ down the center of the card base (mine are portrait orientation).  Layer on your designer paper.  I’ve been punching out a circle or a punched piece of white card stock for the greeting, stamping it, and attaching that piece to the front of the card.  I attach the greeting piece with dimensionals.  I then add some sort of embellishment.

Cut the second piece of designer paper into two pieces that are 6 x 2 ¼ for your envelope flaps. Save the small piece that you have left.  I’ve been using the small leftover pieces to put along the outside edge of the white card stock inside layer.

Thank you so much.  I appreciate you every day.  Many hugs to each of you, Pat


Posted in Uncategorized | Tagged , , , , , , | 1 Comment

You can now leave comments

Hi all, Jim here

I have turned on the “leave a comment” option on a trial basis.  You will find the button to click on is kind of hidden at the bottom of the most recent (and subsequent) posts.

Turning the comments on can really open up a can of worms.  In the past we had comments on and got thousands (literately) of spam comments.

I have now made some significant changes in the spam blocking software and, hopefully that will keep the number of spam comments to a minimum.  I am also exploring software that will improve the comment option, but we will start with the basic approach first

The comments are moderated, which means that Pat will need to approve them before they appear below the post.

We hope that you will comment on her posts and/or ask questions.

Jim

Posted in Uncategorized | 4 Comments

More Boho Cards

Hi Friends,

We’re posting three more Boho cards to show you the versatility of the product medley.


The kit is shown on page 9 of the current catalog, and the item number is 153132.  The price is $70.  This kit gives you so many products and there’s a refill available, which contains all of the paper supplies that come in the kit itself.  It’s only $23, and the item number is 153925.

This month’s host code is:  WY2WHGCGPlease use it when you place an order unless you are placing your club order or unless your total is over $150.  If your order is over $150, you’ll be able to choose host benefits.  There are sets in the back of the catalogs that are bargain priced and only available to hosts or those placing qualifying orders.

When you place a $50+ order, I’ll send you a package with four card kits in it.  We have so much fun getting these card kits ready for you.  They contain all of the paper with all of the die cuts and embellishments that you’ll need to complete them.  SU doesn’t allow us to stamp them for you, but the pictures of them as well as the supplies needed are always posted on my blog.  You’ll need a stamp set, ink, adhesives, etc.

I’d love for you to subscribe to my blog.  All you need to do is fill in your email address and hit submit.

Please let me know if there’s anything I can help you with.  You may call or text me at 303-888-1862 or call me at 303-674-6435.

I appreciate you every day. Thank you so much, Pat

Posted in Uncategorized | Tagged , | 1 Comment

My Television Adventure

I want to tell you about my television adventure.

Being at Stampin’ Up! demonstrator has led me to so many opportunities.  This is just one of the roads I’ve taken.  I’ve gotten to make so many true friends and travel to so many places.

Over the past six or eight months, my friends (customers, members of my Stampin’ Up! team, family members) and I have been sending cards to residents of assisted living facilities and to others who could use a smile.

One of the local television stations in Denver has been featuring a Weekly Warrior—someone who has contributed kindness during this Covid pandemic.  A few months ago, daughter Lisa nominated me, because all of the cards we’ve all been sending to assisted living facilities and others who could use a boost.

Natasha Verma of Denver’s 9News contacted Lisa and said that she’d love to feature me as a Warrior. Each and every one our family members got on a Zoom call and everybody knew what was going on except for me—they surprised me with the news.  Of course, I cried.

Natasha wanted pictures of cards, a video of me stamping, and she wanted to interview Jim & me.  That was a little scary.  It was about a month or so into Covid-19 and I badly needed a haircut.  Daughters Kelly & Judy started trying to find someone who would cut my hair the next day, without my having to be exposed.  They were successful and I got a haircut the day before Natasha was going to do a Zoom call with us (The Zoom call was at 8:00 a.m.—can you imagine?).

I was really nervous until the morning of the call and for some crazy reason, I was calm.  It turned out to be fun; you can barely hear Jim in the interview, but he’s telling her how excited the recipients are.  You could probably hear him better if I weren’t taking up the entire screen. <grin>.

Anyway, if you’d like to see video, here is the link (click here)

If you’d like to send cards, please let me know and I’ll send you the current list.  It only has 10 or 12 names on it now, and the recipients and their families are so thrilled to receive the cards.  There aren’t any rules for the cards; they can be handmade or purchased.

Please subscribe to my blog and invite your friends to join us.

I’d love to hear from you.  You may respond to my email, call or text me at 303-888-1862, or call me at 303-674-6435.

Many hugs to each of you, Pat

Posted in Uncategorized | Tagged , , | Comments Off on My Television Adventure

BOHO Indigo Kit Cards

Hello Friends,

This Boho Indigo kit is truly amazing.  In my “Shop Now” tab there is a direct link.

Here are three cards that we created from this kit (we will post some additional cards in a few days):

You can make at least 50 cards with the included supplies.

Included are:

11-piece photopolymer stamp set
12-piece Boho Indigo Dies set
48 sheets 6 x 6 Designer Series Paper (8 each of 6 double-sided designs)
Very Vanilla 6 x 6 dry embossed sheets
Die cuts with gold foil accents
Night of Navy ½” ribbon (10 yards)
Paper flowers, 40 each
Very Vanilla pleated ribbon (10 yards)

Colors used are: Garden Green, Gold, Misty Moonlight, Night of Navy, Very Vanilla, White

You only need to add card stock, adhesives, blocks (b, c, d are suggested), a couple of stamp pads, envelopes, and your Stampin’ Cut & Emboss Machine.

The item number for the kit is 153132, and the price is $70. Unless you’re placing a club order, please use this host code for the month of September:  WY2WHGCG

It’s a wonderful kit. Please let me know if you have any questions.

You may call or text me at 303-888-1862 or call me at 303-674-6435.

Hugs to each of you, Pat

Posted in Uncategorized | Comments Off on BOHO Indigo Kit Cards

August Incentive Cards

Hello My Dear Stamping Friends,

Here are the recipes for the August incentive cards.

For those of you new to this blog, these incentive card packets are sent to each person who places a minimum order of $50 during August.  Be sure to call or text me if you need more information.

This month we’ve given you 5 cards instead of the normal 4.  They’re so quick and easy that we thought we’d do 5.

If  you are not placing a club order, and you want to place an order, click on the “shop now” tab (be sure to scroll down the page for the link to the order site) and use the host code:  BEWYRQGP.

On the main page of this website there is a box that allows you to subscribe to my blog posts.  If you subscribe, you will receive each new blog post as soon as it is posted.

If you have any questions, please call or text 303-888-1862 or call 303-674-6435.

Thank you so much.

Pat

Little Hello Ovals Card


 Original by Jennie Maier


There are two little strips of paper in your envelope.  We used them on the inside of the card—one at the top and one at the bottom.

This one is so easy that you don’t need directions.

The ovals and circle are attached to the Whisper White piece with snail.

The only thing that is adhered with dimensionals is the little greeting.

Add the Playing with Patterns Resin Dots (which are self-adhesive) and you’re finished.

Supplies used include:

Pattern Play bundle, 100
Itty Bitty Greetings, 44
Crushed Curry card stock, 142
Whisper White card stock, 143
Playing With Patterns designer paper, 149 (three different patterns)
Purple Posy card stock, 143
Memento pad, 146
Playing With Patterns Resin Dots, 157
Tasteful Textile embossing folder, 185
Layering Circle dies, 181
Layering Oval dies, 181

Happy Birthday Dots Card


Original by Jennie Maier


 There are two little strips of paper in your envelope.  We used them on the inside of the card—one at the top and one at the bottom.

Before you attach the polka dot designer paper to the card base, wrap the ribbon around it.  You can either attach it with scotch tape or snail.

Banner the end of the small piece as shown.

Stamp greeting and assemble as shown.  Only the circle has dimensionals under them.

Add the Playing With Patterns Resin Dots.

Supplies used include:

Pattern Play bundle, 100
Many Mates stamp set, 43
Calypso Coral card stock,143
Whisper White card stock, 143
Playing With Patterns designer paper, 149
Calypso Coral pad, 143
Coastal Cabana pad, 142
Blends: pp. 142-143, Dk Pool Party, Lt. Calypso Coral, Lt. Mango Melody, Dk Purple Posy, Lt. Night of Navy
Playing With Patterns Combo ribbon pack, 161
Stitched Shapes dies, 183
Layering Circles dies, 181

Just Thinking of You Colorful Card


Original by Christine Crutcher

 Your card may look different from either of these two cards.  We needed to use at least two different designs in order to get them from one package of designer paper.

Stamp and assemble as shown.

There are dimensionals under the circle.

Add the Playing with Patterns Resin Dots.

Supplies used include:

Many Mates stamp set, 43
Purple Posy card stock, 143
Whisper White card stock, 143
Night of Navy card stock, 142 OR
Coastal Cabana card stock, 142
Night of Navy OR Coastal Cabana card stock, 142
Playing With Patterns designer paper, 149
Stitched Shapes dies, 183


In Good Taste Blue Card


Original by Jackie Bolhuis


We cut the edge of the greeting piece off for a different look and then sponged the edges with navy ink,

The greeting piece is attached with dimensionals.  The flowers are attached with glue dots.

After the card is finished, add the Elegant Faceted Gems.

Supplies used include:

Tasteful Touches bundle, 122
Night of Navy card stock, 142
Whisper White card stock, 143
In Good Taste designer paper, 148
Night of Navy pad, 142
Dimensionals, 162
Small Bloom punch, 165
Elegant Faceted Gems, 157
Glue Dots, 162
Sponge, 147

You Are the Best–In Good Taste Card


This one was copied from page 122 in the catalog.

 Sponge the piece of vanilla card stock with Misty Moonlight ink.  Set aside to dry.

Stamp the white design on the designer paper.  The white pad is such that it comes with a re-inker and pretty much needs to be inked each time you use it.

Assemble as shown and add the Gilded Gems.

Supplies used include:

Tasteful Touches bundle, 122
Early Espresso card stock, 142
Misty Moonlight card stock, 143
Very Vanilla card stock, 143
In Good Taste designer paper, 123 or 148
Misty Moonlight pad, 143
Whisper White Craft Pad and Refill, 147
Early Espresso pad, 142
Gilded Gems, 157
Sponge, 147
Dimensionals, 162


Posted in Uncategorized | Comments Off on August Incentive Cards