March 3, 2024
Hello My Dear Stamping Friends,
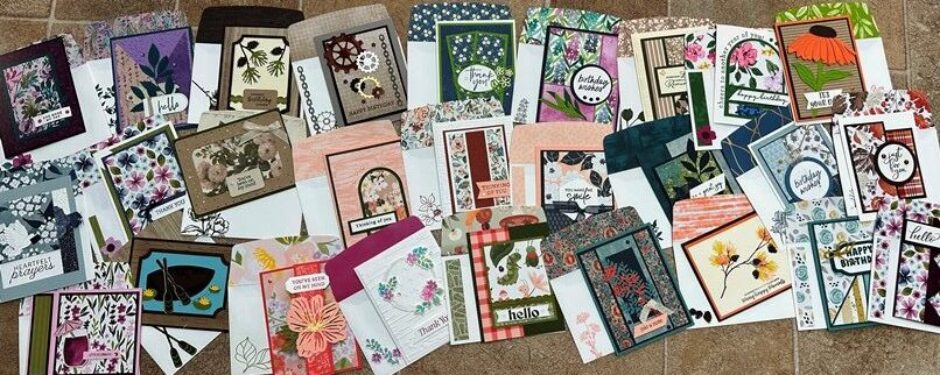
Here are the February Rewards cards and their directions. I hope you enjoy them as much as I have. I especially love the pastel colors in one of the Happy Birthday cards.
If you’d like to place an order that’s not a club order or one that’s over $150, please use my host code FFE2YFFC. Visit www.stampinlady.com and click on Shop Now, Shop Here. If you place an order of $50+ during the month, I’ll send you a packet of four card kits.
By the way, Jim took the February Rewards packets to the post office yesterday so you should have them before too long.
Please let me know if you have any questions or if I can help in any way. Call or text 303-888-1862.
Hugs to each of you, Pat
Nature’s Sweetness Designer Paper Card

Inspired by Mary Fish
Note: As you prepare to assemble this card, please be aware that the Happy & Birthday die cuts have adhesive sheets on the back of them. You need to remove that white adhesive sheet so that you can attach the words to the white “shadow”.
Start by adhering the designer paper to the Pebbled Path pieces.
Attach the embossed white piece to the card base and then attach the larger Pebbled Path piece to that.
Tie knots in each end of the leather strip—a little less than 1” from each end of the leather. You can attach the knots with glue dots and add glue, a glue dot or a dimensional to it in the spot that will be covered by the other Pebbled Path piece.
There are dimensionals under the Happy Birthday piece and also under the smaller Pebbled Path piece.
Supplies used include:
Timeless Arrangements stamp set, (inside greeting), 67
Wanted to Say dies, 167
Timber embossing folder, 169
Thick White card stock, 126
8 ½ x 5 ½
Basic White card stock, 123
5 ¼ x 4
Pebbled Path card stock, 122
5 x 2 ½
3 ¾ x 2 ¼
Pecan Pie card stock (for Happy Birthday), 122
4 ¼ x 2
Nature’s Sweetness designer paper, m 41
Gold & White, 4 ¾ x 2 ¼
Brown grid, 3 ½ x 2
Flap, 6 x 2 3/8
Pecan Pie pad, 122
Dimensionals, 138
Faux Leather Trim, m 41, 7”
Adhesive-Backed Cork Rounds, m 41
Lighter Than Air Designer Paper Card

Original by Mary Fish
Note: As you prepare to assemble this card, please be aware that the Happy & Birthday die cuts have adhesive sheets on the back of them. You need to remove that white adhesive sheet so that you can attach the words to the white “shadow”.
This card is exactly as it looks.
There are dimensionals under the Happy Birthday piece and also under the Lemon Lolly piece.
The twine is tied into a bow and attached with glue dots.
Supplies used include:
Lighter Than Air suite, m 32-34
Thick White card stock, 126
8 ½ x 5 1/2
Basic White card stock, 123
2 x 3 1/2
Fresh Freesia card stock, 123
5 x 3 ¾
Lemon Lolly card stock, 123
3 ¼ x 2
Balmy Blue card stock, 123
2 x 3 ½
Lighter Than Air designer paper, m 33
Front, 4 ¾ x 3 ½
Flap, 6 x 2 3/8
Fresh Freesia pad, 123
Memento pad, 137
Lemon Lolly pad, 123
Dimensionals, 138
Glue dots, 138
Rainbow Adhesive-Backed Dots, m 33
Baker’s Twine three-colored pack, m 33, 9”
Adhesive Sheets, 152334, $11.50, p. 138
Translucent Florals Highland Heather Cards
![]()
Original by Marilyn Pearen
Fussy cut the flower group and attach it to the round white circle. Set it aside.
Attach one piece of the white card stock to the card base and then attach the Highland Heather piece to it. Add the strip of designer paper.
Add the vellum card stock, applying glue or whatever you use so that will be under the white circle as the adhesive will show through.
There are dimensionals under the white circle.
Supplies used include:
Translucent Florals bundle, Online Exclusives, (www.stampinlady.com, click on Shop Now, Shop Here. Click on the little lines in the upper left hand corner, click on Shop Products, scroll down to Online Exclusives), 162253, $54.
Go to Greetings stamp set, 97
Exposed Brick embossing folder, 168
Stylish Shapes dies, 167
Highland Heather card stock, 123
8 ½ x 5 ½
4 x 3 ¼
Basic White card stock, 123
5 ¼ x 4 – 2 each
4 ¼ x 3 ½
Vellum card stock, 126
2 ½ x 3 ¾
Delightful Florals designer paper, Online Exclusives, (www.stampinlady.com, click on Shop Now, Shop Here. Click on the little lines in the upper left hand corner, click on Shop Products, scroll down to Online Exclusives), 162356, $12.50.
Flower, 5 x 5
Small flowers, 4 ½ x 1 ½
Flap, 6 x 2 3/8
Highland Heather pad, 123
Parakeet Party pad, 122
Dimensionals, 138
Tinsel Gems, 3 pack, 140
OR Rainbow Adhesive-Backed Dots, m 33
Baker’s Twine Essentials pack, 144, 8”
Let’s Go Fishing Heartfelt Hexagon Punch Card

Original by Jenny McCormac
Stamp your greeting onto the white punched piece.
Using the Misty Moonlight card stock, position the stamped white punched piece where you want it.
Fit the other punched pieces around it until you’re happy with the placement of all of them. Attach the white greeting piece first, using dimensionals under it. Then attach the others using adhesive of your choice. The white one is the only one with dimensionals under it. You’ll leave about 1/8” of space between the punched pieces.
Before you attach the Misty Moonlight piece to the card base, trim off all of the overhanging pieces. You’ll probably have enough to add a piece to the envelope if you want to.
Don’t forget to add your jewels and the little dragonfly.
Supplies used include:
Let’s Go Fishing suite, 78-79
Celebrate with Tags stamp set, 45
Thick White card stock, 126
8 ½ x 5 ½
Basic White card stock, 123
2 ½ x 2 ¾
Misty Moonlight card stock, 123
5 ¼ x 4
Let’s Go Fishing designer paper, 131
Blue fish, 2 ½ x 2 ¾ – 2 each
Flies, 2 ½ x 2 ¾
Blue, 2 ½ x 2 ¾, – 3 each
Flap, 6 x 2 3/8
Misty Moonlight pad, 123
Tinsel Gems, 3-pack, 140
Dimensionals, 138
Adhesive-Backed Dragonflies & Birds, Online Exclusives, (www.stampinlady.com, click on Shop Now, Shop Here. Click on the little lines in the upper left hand corner, click on Shop Products, scroll down to Online Exclusives), 162743, $8.50.
Heartfelt Hexagon punch, m 12