August 14, 2022
Hello My Dear Stamping Friends,
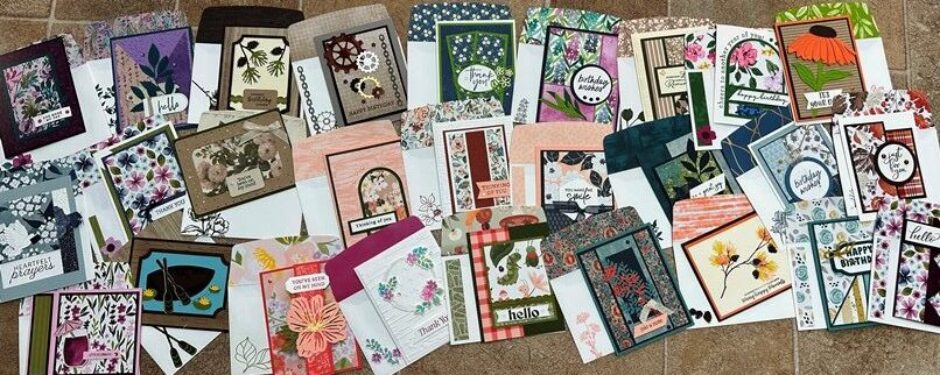
These are the cards that we made at Stamp Camp on Friday. A good time was had by all. I hope you can make it to the next one..
Please remember that Sale-a-Bration is in full swing and August is the last month for it. You’ll get to choose a FREE SAB gift for each $50 that you spend before tax & shipping. A couple of items are already gone and a few have been added.
The items which are gone are:
Pool Party & Soft Sea Foam Cards & Envelopes
Tree Lot Dies
The items which have been added are: (you must use the item numbers shown below in order to get them FREE—not the numbers in the catalog).
$50 Level
163094 Timber 3D Embossing Folder, p. 177
162097 Gingham Embossing Folder, p. 176
163100 Seashells 3D Embossing Folder, p. 177
163102 Brushed Metallic 12 x 12 card stock, p.139
163101 Kraft Gift Boxes, p. 140
163096 Silver Foil 12 x12 Specialty Pack, p. 139
$100 Level
163096 Flowers of Home dies, p. 75 & 161
163098 Dots & Spots die, p. 170
163099 Daffodil dies, p. 21 & 170
163102 Aspen Tree dies, mini p. 46 & 76
If you’d like to place an order, click on Shop Now, Shop Here. My host code is YUHXPG4Q. I’d love for you to use it unless you’re placing a club order or unless your order is over $150 and not a club order, in which case you may claim the host rewards for yourself.
Also please remember that when you place a $50+ order during the month, I’ll send you a packet containing four card kits. The July packets were mailed on Friday; I’m so happy that they’re on their way to you. I think you’ll love them.
Please let me know if you have any questions or if I can help in any way. Call or text: 303-888-1862.
Thank you so much; I appreciate you every day.
Many hugs, Pat
Sending Smiles Split Card

Original by Sally Poole
Adhere the white die cut piece (split card dies) to the Pretty Prints designer paper using glue on the corners of the cut part as well as the intersections.
Stamp the stems as shown. Attach that piece to the card base.
Add the flowers using dimensionals.
Glue “Sending” to the card and use a diamond to dot the “I”. Add the other two diamonds.
Supplies used include:
Sending Smiles bundle, 158707, p.14
Thick White card stock, 159229, p. 140
8 ½ x 5 1/2
Basic White card stock, 159276, p.123
5 1/8 x 3 7/8
4 ¼ x 2
Calypso Coral card stock, 122925, p. 123
4 ¼ x 2
Pretty Prints designer paper, 158247, p. 133
5 ¼ x 4
Subtles designer paer, 159255, p. 13
6 x 2 3/8
Old Olive pad, 147090, p. 123
Calypso Coral pad, 147101, p. 123
Petal Pink pad, 147108, p. 123
Diamonds, 144220, p. 142
Dimensionals, 104430, p. 127
Green Glue, 110755, p. 127
Split Card Textures dies, p. 135
Wildlife Wonder Wolf & Bear Card

Original by Stephanie Steiner
Attach the embossed Evening Evergreen piece to the card base using dimensionals. There are no other dimensionals used on the card.
Stamp the wolf, bear, and greeting and then punch them out. Punch out the other two shapes as shown.
Attach as shown.
Supplies used include:
Wildlife Wonder stamp set, 157923, p. 81
Evening Evergreen card stock, 155579, p. 122
8 ½ x 5 ½
5 ¼ x 4
Basic White card stock, 159276, p. 123
5 ¼ x 4 – 2 each
Texture Chic designer paper, 158808, p. 134
2 x 3
Cork paper, sorry, retired
2 x 3
Neutrals designer paper, 159257, p. 135
Soft Suede pad, 147, 115, p. 123
Evening Evergreen pad, 155576, p. 122
Memento pad, 132708, p. 129
Blends: Lt Gray Granite, 154886, p. 123
Lt Evening Evergreen, 155517, p. 122
Dimensionals, 104430, p. 127
Punch—I’m so sorry; I didn’t realize that it’s retired
Wonderful World Orchid Oasis Card

Original by Lisa Freeman
This card is exactly as it looks.
The flowers and stem are colored using markers (not Blends) directly on to the stamp.
There are dimensionals under the smaller Orchid Oasis piece. The bow is attached with a glue dot (kind of smooshed in your hand).
Supplies Used include:
Wonderful World bundle, 159918, SAB 14
Artistically Inked (greeting), 154542, p. 105
Scalloped Contour dies, 155560, p. 174
Orchid Oasis card stock, 158267, p. 122
8 ½ x 5 ½
4 x 2 3//4
Basic White card stock, 159276, p. 123
5 ¼ x 4
4 ¼ x 3
Daffodil Delight card stock, 119683, p. 122
Scrap Wonderful World designer paper, comes in the bundle, SAB 14
5 ¼ X 4
2022-2024 In Color designer paper, 159253, p. 135
6 X 2 3/8 (flap)
Orchid Oasis pad, 159214, p. 122
2022-2024 In Color markers, 159219, p. 126
Pear Pizzazz marker, Subtles collection, 147156, p. 126
Iridescent Rhinestones, 158130, p. 142
Dimensionals, 104430, p. 127
Linen Thread, 104199, p. 145
Hippest Hippo Poppy Parade Card

Original by Maria Pobre
Attach the designer paper to the card base.
Punch out our Decorative Circle and stamp the adorable hippo on to it or you can stamp and then punch.
Color the hippo as shown.
Attach the hippo piece to the red circle and then attach that to the card.
Add the red rhinestones.
There are mini dimensionals under the greeting.
Supplies used include:
Hippest Hippos stamp set, 159921, SAB 4
Hello Ladybug stamp set, 157693, p. 30
Poppy Parade card stock, 119793, p. 122
8 ½ x 5 ½
2 ½ x ¾
3 x 4
Basic White card stock, 159276, p, 123
5 ¼ x 4
2 ¾ x 3 5/8
Scrap for greeting
Rings of Love designer paper, 159939, SAB 7
5 ¼ x 4
Memento pad, 132708, p. 129
Poppy Parade pad, 147050, p. 122
Red Rhinestones, 146924, p. 142
Dimensionals, 104430, p. 127
Mini Dimensionals, 144108, p. 127
Poppy Parade Blend Dark, 159224, p. 122
Lt & Dk Smoky Slate Blends, 154904, p. 123
Decorative Circle punch, 159174, p. 153
Stylish Shapes dies, 159183, p. 175
Baker’s Twine Essentials pack, 155475, p. 146
Orchid Oasis Hippest Hippo Strips Card

Original by Lynn Starzl
Lay the strips in place to ensure that you have them where you want them. Stamp the greeting and attach the strips with dimensionals.
Attach the hippo and then glue the hearts in place.
Add the embellishments.
Supplies used include:
Hippest Hippo stamp set, 159921, SAB 4
Hippo dies, 159928, SAB 5
Thick Basic White card stock, 159229, p.140
8½ x 5 ½
Basic White card stock, 159276, p. 123
5 1/4 x 4
Orchid Oasis card stock, 159267, p. 122
5 ¼ x 4
¾ x 3
Smoky Slate card stock, 131202, p. 123
2 ½ x 2
Coastal Cabana card stock, 131294, p. 122
¾ x 3
Scrap for hearts
2022-2024 In Color designer paper, 159253 , p. 135
¾ x 3 (2 different papers)
6 x 2 3/8 for flap
Orchid Oasis pad, 159214, p. 122
Coastal Cabana pad, 147097, p. 122
Dimensionals, 104430, p. 127
Green Glue, 110755, p. 127
2022-2024 In Color Matte Decorative Dots, 159186, p. 141
Cajun Craze Koala Card

Original by Carrie Simpson
Lay your frame in place and mark the inside opening corners with a pencil so that you’ll know where to stamp the koala. Lift the frame and stamp the koala.
Attach the frame using tiny dots of green glue.
Stamp and punch out your greeting pieces. The little white greeting piece is attached with dimensionals.
Attach the little bow with a glue dot.
Supplies used include:
Wild & Sweet stamp set, 158775, p. 87
Forever Fern stamp set, 152559, p. 73
Lovely & Lasting stamp set, 158646, p/ 23
Cajun Craze card stock, 119684, p. 123
8 ½ x 5 ½
Scrap
Basic White card stock, 159276, p. 123
5 x 3 ¾ — 2 each
Scrap
Memento pad, 132708, p. 129
Soft Succulent pad, 155778, p. 122
Cajun Craze pad, 147085, p. 123
Fancy Frames dies, 159176, p. 171
Double Oval punch, 154242, p. 154
Baker’s Twine Essentials pack, 155475, p. 146
Glue Dots, 103683, p. 127
Dimensionals, 104430, p. 127
Splendid Day Evening Evergreen Card

Original by Sue Erickson
This one is exactly as it looks. There are no dimensionals used on this card.
Color the plant before attaching it.
Supplies used include:
Splendid Day suite, 159681, mini 64-65
Ranunculus Romance stamp set, 157968, p. 97
Flowering Tulips stamp set, 157672, p. 27
Evening Evergreen card stock, 155574, p. 122
8 ½ x 5 ½
Cajun Craze card stock, 119684, p. 123
2 x 3
Basic White card stock, 159276, p. 123
5 ¼ x 4
3 x 3
Splendid Day designer paper, 159668, mini 65
5 ¼ x 4
2021-2023 In Color designer paper, 159254, p. 135
6 x 2 3/8 (flap)
Memento pad, 132708, p. 129
Blends: Lt & Dk Soft Succulent, 155517, p. 122
Soft Succulent Open Weave ribbon, 155780, p. 146 14”
Or, Evening Evergreen Open Weave ribbon, 155573, p. 146
Elegant Faceted Gems, 152464, p. 142
Hello Harvest Pumpkin Card

Original by Tara Gollem
This one is just as it looks.
There are dimensionals under the greeting only.
Add the Dots after the card is assembled.
Supplies used include:
Hello Harvest suite, 159648, mini p. 48-50
Basic Black card stock, 121045, p. 123
8 ½ x 5 ½
4 ¼ x 3
Basic White card stock, 159276, p. 123
5 ¼ x 4 2 each
2 x 1
Rustic Harvest designer paper, 159633, mini p. 49
Pumpkins: 4 x 2 ¾
Pumpkin (stripes): 2 ¾ x 2 ½ & flap: 6 x 2 3/8
Green strip: 4 x 1 ½
Squiggles: scrap
Mossy Meadow pad, 147111, p. 123
Cajun Craze pad, 147085, p. 123
Brick & Mortar embossing folder, 149643, p. 176
Dimensionals, 104430, p. 127
Brushed Metallic Adhesive Backed Dots, 156506, p. 143
Let’s Set Sail Boat Card

Original by Cindy Coutts
The white card stock is already embossed for you, but you can stamp right over the embossing (we did).
To create the boat pieces, use the Blending Brushes to add color to your piece of designer paper. If I were doing if again, I’d add more Parakeet Party and a little less of Starry Sky as it’s really dark.
There are dimensionals under the two sails and also the white greeting piece.
When you stamp the boat on the envelope and inside, your sails will be on the opposite sides from the one you punched.
Supplies used include:
Let’s Set Sail bundle, 157906, p. 80
Very Best Occasions stamp set, 159871, p. 69
OR, Very Best Occasions bundle, 159879, p. 68
Starry Sky card stock, 159263 p. 122
8½ x 5 ½
Tahitian Tide card stock, 159261, p. 122
5 ¼ x 4
Parakeet Party card stock, 159259, p. 122
2 1/2 x 1 ½
Basic White card stock, 159276, p. 123
5 x 2 ¾–2 each
2 1/2 x 1 ½
Happy Forest Friends designer paper, 158941, p. 132
3 ½ x 3 ½
2022-2024 In Color designer paper, 159253, p. 135
6 x 2 3/8
Starry Sky pad, 159212, p. 122
Tahitian Tide pad, 159210, p. 122
Parakeet Party pad, 159208, p. 122
Blending Brushes, 153611, p. 129
Starry Sky Metallic Woven ribbon, 159198, p. 146
Or Tahitian Tide Metallic Woven ribbon, 159197, p. 146
Dimensionals, 104430, p. 127
Cascading Ruffles embossing folder, 159169, p. 176
Grassy Grove Wolf Card

Inspired by Linda Middleton
Stamp the wolf on to the Smoky Slate card stock using Basic Gray ink. Fussy cut him out cutting the rock straight down instead of cutting it precisely. (Just ask me.)
Lay the card together to determine exactly where you want the wolf to be. Attach him to the moon after deciding. Most of the rock will be placed under the die cut trees.
You can use snail to attach the wolf and moon
You can apply snail to the edges of the die cut piece, but you’ll need to add tiny dots of glue to a few of the leaves/trees.
Supplies used include:
Grassy Grove bundle, 150845, p. 84
Pacific Point card stock, 113350, p. 123
8 ½ x 5 1/2
Basic White card stock, 121045, p. 123
5 ¼ x 4
So Saffron card stock, 105118, p. 123
2 ¾ x 2 ¾
Smoky Slate card stock, 131202, p. 123
2 ¾ x 2 ¾
Brights designer paper, 150258, p. 135
Basic Gray pad, 149165, p. 123
Pacific Point pad, 147098, p. 123
Green Glue, 110755, p. 127