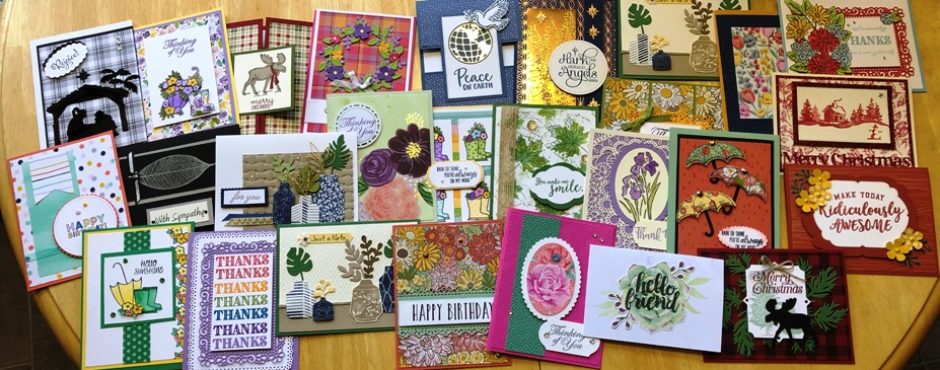
Hello My Dear Stamping Friends,
Here the details of the Friday, October 28, event cards.
Not all of them have the envelopes in the pictures as we haven’t quite gotten that far.
If you’d like to place an order for any of these products or any others, please visit www.stampinlady.com and click on Shop Now, Shop Here. My host code for October is 9PKQJMFC.
If you want more information about any of these cards or if you have any questions, please call or text me at 303-888-1862.
Thank you so much, Pat
Lights Aglow Tree Card

Original by Debbie Crowley
This card is exactly as it looks. The gold ornaments are in a round container and there are tweezers in the tub.
The tree topper is made of two pieces. They are in separate little bags in the tub. Tweezers will be your friend.
There are dimensionals under the gold strip.
This card used the suite or both bundles on pages 30-33 in the mini catalog.
Supplies used include:
Lights Aglow suite, 159556, mini p. 30-33
Brightest Glow bundle, 159552, mini p. 33
Thick Very Vanilla card stock, 144237, p. 140
11 x 4 ¼
4 ¼ x 1
Evening Evergreen card stock, 155574, p. 122
5 ¼ x 4
Cherry Cobbler card stock, 119685, p. 123
4 ½ x 2 ¾
Festive Foils designer paper, 159536, mini p. 31
5 x 3
Lights Aglow designer paper, 159535, mini p. 31
White, 4 ¼ x 2 ½
Tree 5 x 3
Flap 6 x 2 3/8
Gold Glimmer paper, 159537, mini p. 31
3 ¾ x ¾
Scraps
Evening Evergreen pad, 155576, p. 122
Cherry Cobbler pad, 147083, p. 123
Red Rhinestones, 146924, p. 142
OR Festive Pearls, 159963, mini p. 31
Decorated With Happiness Soft Succulent Card

Original by Karen Hallam
This card is exactly as it looks. You do have a choice whether you use the two-step stamping technique to fill in the bulbs or you can color them in with the Light Blends of the colors. If you choose the two-step method, you need to stamp off to fill the ornaments with color.
There are dimensionals under the cherry cobbler card stock.
Supplies used include:
Decorated with Happiness bundle, 159711, mini p. 27
Soft Succulent card stock, 155776, p. 122
8 ½ x 5 ½
Cherry Cobbler card stock, 119685, p. 123
4 ½ x 3 ¼
Basic White card stock, 159276, p. 123
5 1/4 x 4
4 ¼ x 4 ½
Lights Aglow designer paper, 159535, mini p. 31
5 ½ x 3
Flap, 6 x 2 3/8
Highland Heather pad, 147103, p. 123
Cherry Cobbler pad, 147083, p. 123
So Saffron pad, 147109, p. 123
Evening Evergreen pad, 155576, p. 122
OR, Lt Cherry Cobbler Blend, 154880, p. 123
Lt Highland Heather Blend, 154887, p. 123
Diamonds, 144220, p. 142
Dimensionals, 104430, p. 127
Sweetest Candy Canes Card

Inspired by Sue Kempter-Miller & Krissi Hannahs
There are dimensionals under the candy canes and under the greeting.
You may want to use a toothpick to apply the glue to the green and red pieces.
Supplies used include:
Sweetest Christmas suite, 159579, mini p.8
Garden Green card stock, 102584, p.123
8 ½ x 5 ½
Real Red card stock, 102482, p. 123
5 x 3 ¾
Basic White card stock, 159276, p. 123
5 ¼ x 4
1 x 4
Red Glimmer paper, 159578, mini p. 9
2 x 1
Gold Glimmer paper, 156844, p. 139
3 x ¾
Sweetest Christmas designer paper, 159559, mini p. 9
2 candy canes
Flap 6 x 2 3/8
Festive Pearls, 159963, mini p. 31
Dimensionals, 104430, p. 127
Merry Melodies embossing folder, 156392, p. 176
Green Glue, 110755, p. 127
Peace to You Navy & Vanilla Card

Original by Mary Fish
You’ll need to use the stamparatus for this card so that you can stamp the image multiple times until you’re happy with it.
Debbie has drawn on a piece of the grid paper so that you’ll know where to place your card stock. Don’t forget to use the magnets. The best places to put them seem to be in the bottom right corner where there’s a little extra space and in the upper left corner.
You probably won’t need to clean the stamp between your own stampings, but it would be nice if you’d clean it with one of the wipes after you’re finished stamping your image.
After you stamp the half circle with your greeting, attach it to the back of the navy piece.
Place your ribbon around the 5 ¼ x 4 vanilla card stock. Attach the completed top layers to the vanilla piece and then attach the vanilla layer to the card base using dimensionals.
You will probably want to put glue dots under each end of the bow to keep it in place.
Add your diamonds.
Supplies used include:
Peace to You stamp set, 159776, mini p. 41
Thick Very Vanilla card stock, 141237, p. 140
8 ½ x 5 ½
Very Vanilla card stock, 101650, p. 123
3 ¼ x 3 ¼
3 x 3
1 x 3 (inside)
Night of Navy card stock, 100867, p. 123
3 ½ x 3 ½
4 x 2 (inside)
Brushstroke paper, 159250, p. 139
Flap, 6 x 2 3/8
Night of Navy pad, 147110, p. 123
Natural Woven ribbon, 159611, mini p. 25
Diamonds, 144220, p. 142
Glue Dots, 103683, p. 127
Dimensionals, 104430, p. 127
Stylish Shapes dies, 159183, p. 175
Stamparatus, 146276, p. 147
Dancing Gnome Card

Original by Susan Campfield
The card is much easier than it looks.
We’re showing you two different ways to make this fancy fold. This one is probably the easiest .
Start assembling your Santa gnome by attaching his hat to his beard with glue or snail—put it on the back of the hat. Attach his nose using a mini dimensional.
The mechanism piece is cut from the Candy Canes dies and then the sides were trimmed off. You only need one half of the die cut piece for your card.
Attach the feet to the mechanism piece with glue or snail.
Decide where you want the legs to be on the white piece. DO NOT ADHERE THE LEGS. Just lay them on the piece and place a mini dimensional inside the piece (see picture in tub). You will be attaching the beard/hat piece to the mini dimensional and it will keep the legs on the card but will also allow them to swing freely back and forth.
Place three mini dimensionals, one on each outside point where you attached the hat and at the top point of the hat. Leave the center of the beard open with NO dimensionals so they don’t interfere with the feet swinging.
Adhere the gnome body to the mini dimensional that is in the center of the mechanism over the feet. Lay the gnome body on the card before removing the cover of the mechanism dimensional to determine exactly where you want the gnome to be placed.
The front bottom piece of the card is scored at ½”—fold it on the score line and attach it to the back of the card, lining it up with the bottom of the card.
The rest of the card is exactly as it looks. Only apply adhesive to the bottom of the gnome piece to attach it to the card base.
Add the sequin to his hat.
There are mini dimensionals under the greeting.
Supplies used include:
Kindest Gnomes suite, 159631, mini p. 42-43
Candy Cane dies for making swinging piece, 159569, mini p. 78
Real Red card stock, 102482, p. 123
5 ½ x 4 ¼
2 ¾ x 4 3/4, scored at ½ inch
2 ¾ x 4 ¼
2 x 2 (for feet)
Basic White card stock, 159276, p. 123
2 ½ x 4 (gnome base)
2 ½ x 4 (inside)
3 x 3 (beard & greeting piece)
2 ¾ x 1 ½ (piece that lets the feet swing)
Blushing Bride card stock, 131198, p. 123
Nose 1 x 1
Sweetest Christmas designer paper, 159554, mini p. 9
Stripes 5 ¼ x 4
Dots 4 x 2 ½
Dots, gnome hat 2 x 2 ¼
Inside candy cane print, 2 ½ x 1
Flap 6 x 2 3/8
Real Red pad, 147084, p. 123
Dimensionals, 104430, p. 127
Adhesive Backed Seasonal Sequins, 159964, mini p. 9
Leaves of Holly Card

Original by Michelle Haney
Color your Textural Element (berries) with the markers in the tub and set it aside to dry.
Adhere the two layers of the leaves using green glue.
Start assembling the card by adding the designer paper to the bottom of the vanilla musical piece. Add your assembled leaves. Wrap the Old Olive ribbon around that piece as shown.
The berries are attached with glue dots.
The gold cord is looped and attached to three dimensionals that are attached to the front of the leaves—it might be easier to attach the dimensionals to the back of the greeting piece. You can do it any way you want or eliminate the cord all together.
There are dimensionals under the bottom of the greeting piece also.
The envelope and inside leaves are stamped first with Old Olive ink and then the second layer is stamped with Mossy Meadow ink.
Supplies used include:
Leaves of Holly suite, 159612, mini p. 24-25
Christmas to Remember, 156300, p. 45
Cherry Cobbler card stock, 119685, p.123
8 ½ x 5 ½
Mossy Meadow card stock, 133676, p. 123
5 ¼ x 4
4 ¼ x 3 ½
Old Olive card stock, 100702, p. 123
4 ¼ x 3 ½Very Vanilla card stock, 101650, p. 123
5 x 3 ¾–2 each
Boughs of Holly designer paper, 159600, mini p, 25
3 ¾ x 1 ½
Flap 6 x 2 3/8
Mossy Meadow pad, 147111, p. 123
Cherry Cobbler pad, 147083, p. 123
Old Olive pad, 147090, p. 123
Textural Elements, 159966, mini p. 25
Merry Melodies embossing folder, 156392, p. 176
Dimensionals, 104430, p. 127
Old Olive Twill ribbon combo, 158955, p. 145
Simply Elegant Trim, 155766, p. 145
Cherry Cobbler marker (for coloring Textural Elements), 147155, p. 126
Deckled Edge dies, 159173, p. 170
Green Glue, 110755, p. 127
Trees for Sale Card with Puppy

Original by Akemi Geary
It looks as if the tree is stamped in two different colors, but the bottom layer of the tree is Soft Succulent stamped off.
There are dimensionals under the circle and under the left side of the sign.
Supplies used include:
Trees for Sale stamp set, 159780, mini p. 39
Thick Very Vanilla card stock, 144237, p. 140
8 ½ x 5 1/2
Very Vanilla card stock, 101650, p. 123
4 ¼ x 3 ½
Lights Aglow designer paper, 150535, mini p. 31
5 ½ x 2
6 x 2 3/8
Cherry Cobbler pad, 147083. P. 123
Soft Succulent pad, 155778, p. 122
Sahara Sand pad, 147117, p. 123
Stylish Shapes dies, 159183, p. 175
Dimensionals, 104430, p. 127
Elegant Faceted Gems, 152464, p. 142
Blends:
Lt Cherry Cobbler, 154880, p, 123
Lt Soft Succulent, 155521, p. 122
Trees for Sale Tree Card
 Original by Priscilla Ivler
I think you’ll want to use a toothpick to add glue to the tree design piece.
The Merry Christmas was stamped before the vanilla piece was embossed with the Wintry embossing folder.
Adhere all of the strips to the front of the embossed piece as shown. Let them hang off each side and then turn the piece over and trim all of them at the same time.
Assemble the card completely and stamp the inside and the envelope before proceeding. The trees inside and on the envelope are stamped first with stamped off with Mossy Meadow ink and then full strength for the second layer.
There are dimensionals under the round piece.
The dots are from the Pearlized Enamel Effects Basics, which are in the tub. Squeeze very gently and then set the pieces aside to dry. The enamel effects are added to the tree on the envelope and the tree on the inside.
Supplies used include:
Trees for Sale stamp set, 159785, mini p. 39
Christmas to Remember stamp set, 156300, p. 43
Mossy Meadow card stock, 133676, p. 123
11 x 4 ¼
2 x 2
½ x 5 ½
Very Vanilla card stock, 101650, p. 123
5 x 3 ¾ 2 each
2 ¾ x 2 ¾
Cherry Cobbler card stock, 119685, p. 123
½ x 5 ½
Old Olive card stock, 100702, p. 123
2 x 2
½ x 5 ½
Boughs of Holly designer paper, 159535, mini p. 31
Flap 6 x 2 3/8
Mossy Meadow pad, 147111, p. 123
Cherry Cobbler pad, 147083, p. 123
Dimensionals, 104430, p. 127
Wintry embossing folder, 155433, p.177
Pearlized Enamel Effects Basics, 156310, mini p. 59
Stylish Shapes dies, 159183, p. 175
Trimming the Trees dies, retired SAB
Dancing Witch Hat Card
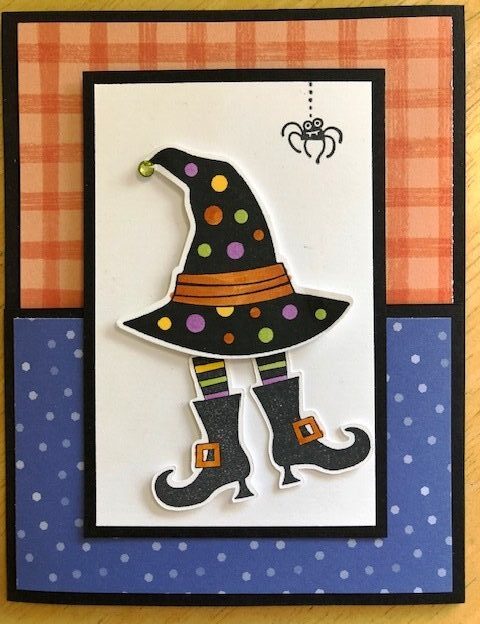
Original by Connie Ingram
The card is much easier than it looks.
We’re showing you two different ways to make this fancy fold. This one has a piece 4 ¼ x 2 ¾ cut from the black card stock, which is then used for the front piece.
Stamp your hat on the extra white piece (5 ½ x 4 1/4). Punch it out using the hat punch. Then stamp the feet and fussy cut them out, leaving them attached at the top. You can cut them however you want—you can leave the space between the feet white without cutting it if you want.
Color those pieces with the Blends.
Stamp the spider on the white piece as shown, both on the inside and outside of the cards as well as on the envelope.
The mechanism piece is cut from the Candy Canes dies and then the sides were trimmed off. You only need one half of the die cut piece for your card.
Attach the feet to the mechanism piece with glue or snail.
Decide where you want the legs to be on the white piece. DO NOT ADHERE THE LEGS. Just lay them on the piece and place a mini dimensional inside the piece (see picture in tub). You will be attaching the hat piece to the mini dimensional and it will keep the legs on the card but will also allow them to swing freely back and forth.
Place three dimensionals on the back of the hat—a large one at the top and minis on each point of the hat. Leave the center of the hat open with NO dimensionals so they don’t interfere with the feet swinging.
Adhere the hat to the mini dimensional that is in the center of the mechanism over the feet. Lay the hat on the card before removing the cover of the mechanism dimensional to determine exactly where you want the hat to be placed.
The rest of the card is exactly as it looks. Only apply adhesive to the bottom of the witch piece to attach it to the card base.
Assemble as shown.
Supplies used include:
Bewitching stamp set, 159855, mini p. 57
Witch Hat Builder punch, no longer available
Candy Cane dies (for swinging piece), 157569, mini p. 78
Basic Black card stock, 121045, p. 123
8 ½ x 5 ½
Basic White card stock, 159276, p. 123
2 ¾ x 1 ½ — swinging piece
5 ½ x 4 ¼ — hat & feet
4 x 2 ½ — 2 each inside & front
Gingham Cottage designer paper, 12 x 12, 159651, mini p. 59
Orange plaid, 5 ¼ x 4
Green strip inside, ½ x 2 ¾
2022-2024 In Color designer paper, 159253, p. 135
4 x 2 ½
Flap, 6 x 2 3/8
Memento pad, 132708, p. 129
Diamonds, 144220, p. 142
Dimensionals, 104430, p. 127
Blends:
Pumpkin Pie, 152897, p. 123
Daffodil Delight, 154883, p. 122
Mint Macaron, 154889, p. 123
Flirty Flamingo, 154884, p. 122
Soft Seedlings Fall Leaf Card

Original by Karin Braxton
This card uses the baby wipes technique where you’ll put drops of reinker onto the baby wipe and let it spread to become your ink pad. A newer way, maybe better, is that you’ll stamp the leaf onto the clean baby wipe with light colored ink so that you’ll be able to somewhat control what your leaf will look like. We’ll show you.
You’ll stamp the leaf three time from your one ink creation—one the outside piece, on the inside and on the envelope.
There are dimensionals under the Cajun craze piece.
Supplies used include:
Soft Seedling stamp set, 159905, mini p. 53
Cajun Craze card stock, 119684, p. 123
8 ½ x 5 ½
3 ½ x 2 ¾
Mossy Meadow card stock, 133676, p. 123
Basic White card stock, 159276, p.123
5 x 3 ¾ — 2 each
3 ¼ x 2 ½
Metallic & Shimmer designer paper, 159909, mini p. 41
4 ¼ x 1
Rustic Harvest designer paper, 159633, mini p. 49
4 ¼ x 1 – 3 colors
Mossy Meadow pad, 147111, p. 123
Brushed Metallic Dots, 155506, p. 143
OR, Rustic Metallic Dots, 159082, p. 143
Dimensionals, 104430, p. 127
Reinkers:
Regals, 147172, p. 126
Cherry Cobbler
Pumpkin Pie
Crushed Curry
Cajun Craze
Neutrals, 147175, p. 126
Mossy Meadow