February 22, 2026
Hello My Dear Stamping Friends,
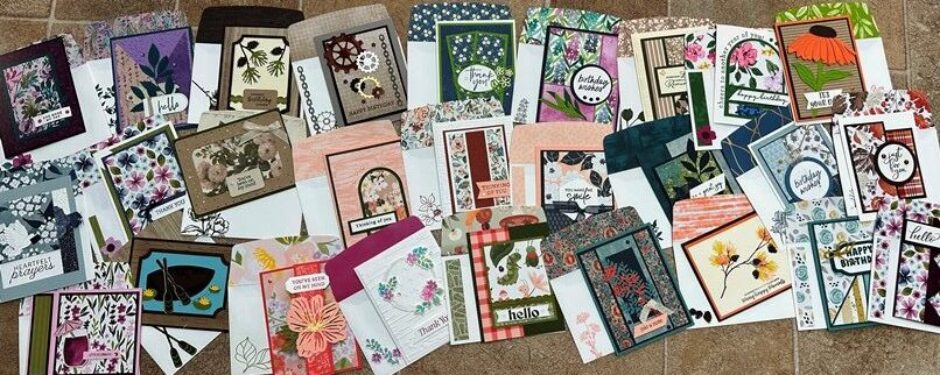
Here are the December Rewards cards. You probably already have your packets and are awaiting the pictures & directions. I apologize for their being so late.
We’re working on the February packets.
I love these cards, as always.
If you’d like to place an order, please visit www.stampinlady.com and click on Shop Now & Shop Now again. It might take a minute to load.
If you have any questions or if I can help in any way, call or text 303-888-1862.
Thank you so much for your orders.
Many hugs to each of you, Pat
Cute as a Bug Designer Paper Card

Original by Karen Titus
Isn’t this the cutest card?
It’s exactly as it looks; there are dimensionals under the greeting piece.
I put your ladybug & your clear dots in a baggie so they wouldn’t get lost.
Supplies used include:
Arched Wishes bundle, OL 164630, $45
Mossy Meadow card stock, 139
8 ½ x 5 ½
Old Olive card stock, 139
4 ¼ x 3 ¼
Basic White card stock, 137
3 x 1
5 ¼ x 4
Cute as a Bug designer paper, m 43
Bugs 3 x 3
Card front leaves, 3 x 1
Red plaid, 5 ½ x 2
Flap, 6 x 2 3/8
Inside & Envelope pieces, 4 x ¾ — one for each (2 total)
Mossy Meadow pad, 139
Old Olive Specialty Rickrack, 5”, m 43
Dimensionals, 112
Ladybug Garden Epoxy Shapes, m 43
Lovely & Beautiful Designer Paper Card


Inspired by Su Mohr & Cindy Brumbaugh
I love this card and this designer paper. It looks tricky, but it’s actually very easy. It’s scored for you at 1 ¼ & 4 ¼ from one side.
Adhere the designer paper & the white inside piece to the card base first.
The flower pieces are attached & layered with glue dots.
Add the yellow piece last or it could end up sideways.
We did not adhere the piece that the flower is attached to, to the front of the card—it swings freely.
Supplies used include:
Words of Beauty bundle, OL 167090, $45.85
Simply Beautiful bundle, m 23-29
Calypso Coral card stock, 138
8 ½ x 5 ½
Score at 1 ¼ & 4 ¼ from one side
Petal Pink card stock, 138
3 ¼ x 5 ½
Lemon Lolly card stock, 138
1 ½ x 2
Old Olive card stock, 139
1 1/2 x 2
Basic White card stock, 137
5 ¼ x 2 ½
2 ½ x 1
Lovely & Beautiful designer paper, m 25
Calypso Coral strip, 5 ¼ x 1
Front & inside pieces, 5 ¼ x 2 ¾ (2 each)
Narrow floral strip, 5 ¼ x 1 ¼
Flap, 6 x 2 3/8
Calypso Coral pad, 138
Old Olive pad, 139
Glue Dots, 113
Pearlized Faceted Circles, m 25
Perennial Lavender Designer Paper Split Card

Inspired by Ruth Norton
Pat & Debbie
This design is new to us & I really like it.
I first cut it using directional paper & it doesn’t work that way. I cut a piece of dsp 5 x 3 ¾ for this card. I then cut it in half diagonally. The trick is that you’ll turn one of the halves over. It’s so easy and looks complicated. The split design can be used either horizontally or landscape.
I also used a new embossing folder that I really like. It’s called Stone & Vine and is in the mini catalog on page 69.
There are no adhesive sheets used—just tiny dots of glue under the leaves.
The only dimensionals used are under the greeting piece.
I especially love the Purple Fine Shimmer Gems on this card. Who doesn’t like purple?
Supplies used include:
Everyday Arches bundle (greeting piece), OL 164630, $45
Fabulous Sayings (January’s Product of the Month), still available for $5 with $75+ purchase
Nature’s Symphony bundle, m 32-41
Pretty Peacock card stock, 139
8 ½ x 5 ½
4 ¼ x 3 ½
Highland Heather card stock, 138
5 ¼ x 4
Basic Beige or Very Vanilla card stock, 137
3 ½ x 2
Basic White card stock, 137
5 ¼ x 4
3 x 2
Perennial Lavender designer series paper, 118
5 x 3 ¾ — cut in half diagonally
Pretty Peacock pad, 139
Dimensionals, 112
Mini Dimensionals, 112
Purple Fine Shimmer Gems, OL 162611, $8
Stone & Vine 3D embossing folder, m 69
Linen Thread, 10”, 127
Extraordinary Flora Card

Inspired by Su Mohr
I’ve had the supplies for this card for awhile but hadn’t found anything that I really liked until I saw a version of this one.
The circle piece was assembled as follows: I cut the attached circles piece using the Lovely Arrangements dies (it is a rectangle). Then I glued it onto another piece of Basic White card stock. I didn’t use very much glue—just tiny dots in a few spots. Then I sent the whole thing through using the Spotlight on Nature circle die. The die had no trouble cutting both pieces at the same time.
The washi tape is 3 ¼ inches wide & 10 yards long. Each pattern group is about 5 ½ inches long. It comes in a roll (like tape) so you need to attach it to something (we used Basic White card stock). The die fits the washi tape perfectly & it’s very easy to cut out (I used a couple of very small pieces of scotch tape to temporarily attach the die to the card stock—the tape was easily pulled away from the card stock after each pass through the Cut & Emboss machine). It was easy—much, much easier than I thought it would be.
Each of you has received one full pattern group (a couple of you have randomly received some extras) so you should have plenty of floral pieces. We put some on the inside and on the envelope. (If you put some on the envelope, be sure that every bit of it has adhesive on it or it won’t make it through the mail.) You may have enough for a couple of cards.
There are dimensionals under each of the flower pieces & the greeting piece.
Supplies used include:
Extraordinary Flora bundle, OL 165245, $43
OR Extraordinary Flora die, OL 165244, $28
AND Extraordinary Washi Tape, 165269, $15
Lovely Arrangements bundle, OL 167176, $48.50
Spotlight on Nature dies, OL 163580, $35
Birch Wood embossing folder, 109
Thick White card stock, OL 159229, $17
Basic White card stock, 137
5 ¼ x 4
3 ¾ x 3 — 2 each
4 ¼ x 1 (greeting piece)
Brights or In Color designer paper sets, 121
Flap 6 x 2 3/8
Strawberry Slush (p. 137) or Berry Burst (p. 138) pad (2 different color combos in the washi tape)
Dimensionals, 112
Rhinestone Basic Jewels, 125